
Very recently, I’ve been looking high and low for a solution to the problems I had been having with Mailchimp, my previous email marketing service. If you don’t know what an email marketing service is, it’s what you use to hold a list of email addresses (also known as subscribers) so that you can send mass emails to them.
As a part of anti-spam laws, these subscribers had to have opted in (or joined) your list somehow. So if you know someone who’s sending mass emails that you didn’t ask for promoting a product or service to you from their personal email, they’re probably not following the anti-spam laws.
Now that I’m fully making the plunge into my newly branded online business, I knew there were some things that I had to “go pro” with. With that, the first upgrade I had to make was my email marketing service provider. For about five years now, I’d been using Mailchimp’s free option. It worked for me for a long time, while I was figuring out what I wanted to do and I didn’t have any complaints. Well, maybe a few. But I’ll tell you about those later in the post.
First, a little about Mailchimp. Then I’ll tell you why I switched from Mailchimp to Convertkit.
Mailchimp is actually pretty cool. Their interface is really nice, modern, and sleek. I’ve always enjoyed logging in and using the application. It’s pretty straightforward, although certain very important things are difficult to find. I always had a hard time finding API keys (an individual code used to integrate with other applications) or even where to update my contact information. It seemed that I had to put the same information in three different places before it was all fixed.
With Mailchimp’s free option, you can have multiple “email lists”, have up to 2,000 subscribers on your list, and send 12,000 emails per month. So if you have a list of 2,000 you’re allowed to send 6 emails per month using your free option. Here’s the catch and one of the first glitches I found in the system. If you have multiple lists and the same person on different lists, Mailchimp counts them as different subscribers. For instance, if the same person is on 3 lists, they are considered 3 subscribers. No fair right?!
Mailchimp also has a library of email design templates along with a “drag and drop” editor that allows for you to customize your email. It’s pretty easy to create your own pretty template, although sometimes it was a huge pain to make a small change in an email design. No big deal though.
So here’s where I hit my roadblock.
I started to create mini courses and challenges for my subscribers. When creating these mini courses, I wanted to set it up so that I’d create the course to automatically begin sending (also known as “dripping”) as soon as someone signs up for the course. In Mailchimp, it was possible to do this using “automations”. If you think about the name, what I’m saying makes sense. For example, an automation is when someone signs up or “opts in” to a course, and your email service provider is then “automated” to send out a series of emails to that subscriber.
Using Mailchimp’s free option, I had to manually send my mini course to my list. That caused a load of annoyances when it came to running a challenge or course. I had to manually send out the email each day. Imagine what a pain that is for a work at home mom who has unpredictable toddlers running around. It’s just asking for mishaps.
I looked into my backend of Mailchimp and start figuring out the automation, which was showing up there as if I could use it. I thought this was pretty rude of Mailchimp since it wasn’t even an option for me with a free account. If it’s not offered, don’t make it available. It’s either a really good tease or a clever marketing technique to make you want to upgrade after spending hours on an automation.
So when I finished my entire automation, I went to press “go” or “begin” or “automate” and found no option. Not to mention, creating the automation was a MAJOR pain. I had to go through, page by page, and enter individual information and create a whole template for each email in the sequence of my automation. It took FOREVER!
Imagine how upset I was when I realized this wasn’t even a feature in my plan! So that’s when I began my hunt for the right email service provider. Why? Because I wasn’t ready to upgrade to Mailchimp’s paid subscription without researching my options first. Why invest in something that’s already a pain?
Enter Convertkit.
Why I Decided to Leave Mailchimp and Switch to Convertkit
I have never been more pleased or motivated to write email than how I am now. Let me tell you why.
Convertkit is still quite new to the game but it sure packs a punch. It was created by Nathan Barry, a designer, author, and blogger, who saw a couple of glitches in the email marketing system world. It’s like he knew exactly what us infopreneurs, bloggers, and online marketers needed to grow our businesses. Email, obviously! There are so many reasons why he knows what he’s doing. I’m actually going to show you by listing the problems I had with Mailchimp and how Convertkit had the solution.
Problem #1: I couldn’t create automations with my free Mailchimp account & once I did, they were too difficult and time-consuming to create
While Convertkit doesn’t have a free option, it starts at a very inexpensive price of $29 a month. That cost includes ALL of the features that Convertkit has to offer. No need to upgrade to get more features, you just get it all. For someone serious about professional blogging, it’s a no-brainer.
Solution: When I switched from Mailchimp to Convertkit, it took me less than 10 minutes to enter all of the information for one of my 5 day challenges. Under 10 minutes! Convertkit makes it so easy to create drip email courses, all in an simple interface that allows your creative brain to move through quickly. For example, I can be working on day 5 of a course and remember something that had to go in day 3. I just quickly click on day 3, add my update, and go back to editing day 5.
Here’s a screenshot to demonstrate what I mean. You’ll also notice how you can drag and drop a day from one slot to the other. In the screen of each day, you can enter how many days out that email is sent to your subscriber.
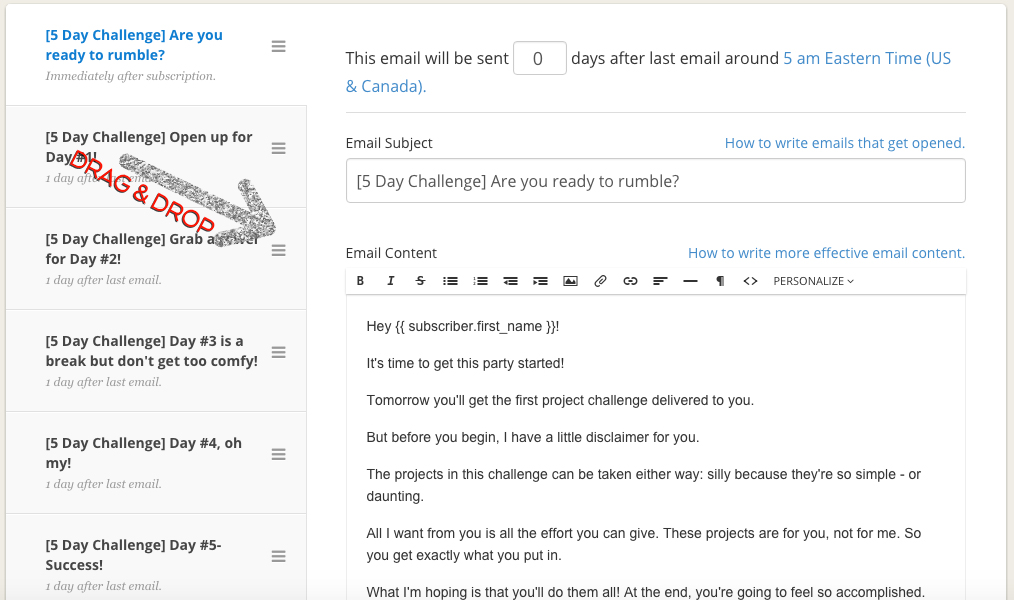
As you can see, making a course is a piece of cake. This can be a free or paid email course. Oh, did I add that you can have an unlimited amount of courses or automated email content?! To think, this is only one of the Convertkit features I love.
Problem #2: Emails were ending up in spam
This is an easy one to explain. Recently, Gmail changed their emails to included primary, social, and promotions tab. With Mailchimp, I was instructed to tell my subscribers that my emails would be sent to the “Promotions” tab or the Spam folder. Obviously, who wants that when they’re trying to run an online business?! Even worst, most of my emails are delivering free content that I was giving to my list. If my emails were ending up in Spam, how was I supposed to reach any goals?!
Solution: Convertkit is my solution to this problem. With whatever they do in their amazing techy backend, my emails will no longer end up in Spam or Promotions. You get my emails right in your inbox where they should be. Now I can actually help you like I want to!
Another added bonus is that Convertkit shows you how many people haven’t opened your emails. That way, a week later, you can send out the same email to those who haven’t opened it. Awesome feature right?!
Problem #3: While emails in Mailchimp were beautiful, they were too complicated to create
I wasted entirely too much time trying to fix my Mailchimp emails, taking me away from writing the actual email. Every time I wrote an email, even if I was using a pre-made template, I was spending more time fixing the format than writing the actual email.
Solution: The first thing I noticed when I switched to Convertkit was that it doesn’t have a fancy drag and drop editor, the creators have kept it simple and to the point. I can still add pretty images to my emails and make them look nice, without the added and un-needed time wasters. At the end of the day, my readers aren’t worried about how fancy my email is and how the borders look- they’re concerned about the content I give them. I have exactly what I need with Convertkit. I can add links, pictures, video, and even html if I need to. As they say in Tarzan, “It’s just the bare necessities”!
Problem #4: Mailchimp charges for duplicate subscribers
As I mentioned before, if a subscriber is on 3 different lists of yours, they’re considered 3 subscribers.
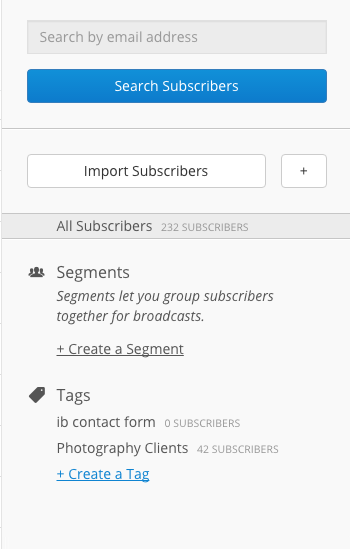
Solution: Convertkit is smarter than that! It allows you to assign multiple tags to subscribers. For example, I have subscribers that are photography clients and others that are clients for my online business. Some subscribers are photography clients as well as consulting clients. In Mailchimp, the same person would have been two. In Convertkit, I can just tag one person with multiple tags or have them subscribed to multiple forms. The same person could be a client, join a challenge, and even join an online course. I can filter through my subscribers and send emails only to the ones with a certain tag if I want to. In the end, I’m only charged for that one person as a part of my list.
Problem #5: More List & Form Problems
Mailchimp gave me a lot more grief with lists. First of all, I could only have one opt-in (signup) form per list. So what if I had two different freebies that I offered to people who came to my website. For example, my Instant Clarity Toolkit. I want the people who sign up for each thing to join the same list.
Not with Mailchimp.
With them, I would have to create two different lists to allow for different forms. Then, if I wanted to email everyone, I’d have to send the email individually to each list. Lots of added work. Oh yeah, and remember the problem with duplicate subscribers? That means that those people would get the same email twice, or three times if applicable.
Solution: Another reason why I chose Convertkit is that I can have as many forms as I want, and people are added to my one big list. They’re just assigned tags according to what they’ve signed up for. Easy peasy!
I can seriously go on and on about how much more I can do from there, like create separate automations based on the form. I also didn’t mention how you can see individual statistics for each form and how it’s performing! Not with Mailchimp.
More Wonderful Features
With Convertkit, I can also harness the power of marketing automation! This is a feature that you usually only get with big fancy email service providers like Infusionsoft or Office Autopilot (providers that have way more than I need).
Marketing automation workflows work in an “if this, then that” format”. For example, if someone signs up for a free chapter of your book and then buys your book, you obviously don’t want to keep marketing to them to buy your book. In Convertkit, you can set rules that say when they purchase the book, they are removed from your email pitch sequence to buy the book. Pretty cool huh? It saves you from annoying otherwise happy customers!
Finally, another awesome feature is that when existing subscribers go to your website, it shows them either a customized message where there would have been an opt-in form, or a different opt-in form. Convertkit is smart enough to show different forms on blog posts according to what the post content is about.
Zapier Integration
Yet another lovely feature that I can take advantage of is Convertkit’s integration with Zapier. Zapier is a useful tool to use in your business systems if you’re trying to save time. Set up “zaps” in zapier that trigger actions. For example, when I create a new invoice in my accounting software, that person’s email address is added to my Convertkit account and tagged as a “photography client”. That way, next time I want to send an email to all of my photography clients, their email addresses are all in there waiting for me. I no longer have to manually add their email addresses. Great right?!
Podia Online Course Platform Integration
The latest and greatest about Convertkit is that it easily integrates with my favorite platform, Podia, for online courses. Podia is hands down, the easiest online course platform that I’ve ever experienced. I can create unlimited online courses and digital downloads and, best of all, it takes seconds!
I can also easily tag my students with their Convertkit tags right from within the Podia interface. As soon as someone signs up for a course or a freebie from my online course platform, Podia, they are added to my Convertkit list under the product they purchased or the freebie they signed up for. The two platforms talk to eachother very easily and I don’t have to worry about using anything else!
So What’s the Verdict?
If that’s not enough reasons why I switched to Convertkit, then I don’t know what is! It’s pretty much a no-brainer right?! Convertkit literally provides you with an entire suite of tools designed to help you succeed as a professional blogger. While they’re still new to the game and don’t integrate with everything, Zapier gives us all the solutions to help bridge those gaps. I’ve been able to completely automate my online business with what Convertkit (and the occasional help from Zapier) offer me.
While Mailchimp still has a special place in my heart as they helped me jumpstart my email marketing, I’m excited for what I can do moving forward with my online business. I encourage you to give Convertkit a shot! Plus, you have nothing to lose as they give you a 30 day money back guarantee. You seriously have nothing to lose!
This post contains affiliate links. For more information, see my disclosures here.

Hi there,
I just read your post regarding switching from MailChimp to Convertkit. I am setting up my first online course on Podia (totally love it too!) and investigating migrating my MailChimp account into Podia – or just integrating the two.
I am curious to understand from you please, given your current high level of experience, why have you not just used Podia for your email marketing? Is there something I should know.
Thanks a mil,
Angela.